Fresh paint will not hide a poor wall repair. In fact, a new coat often makes dents, cracks, joins and uneven patches more visible, especially under Melbourne’s strong natural light. This plaster repair before painting guide explains how to prepare walls properly so the finished paintwork looks clean, smooth and professionally completed.
Start by finding the cause of the damage
Before filling anything, take a close look at the wall. Small nail holes from picture hooks, light scuffs and shallow dents are usually straightforward cosmetic repairs. A fine crack may be caused by normal movement in the building, particularly around doorways, windows and cornice lines. These can often be repaired successfully when the surrounding plaster is firm and dry.
Damage that keeps returning needs more attention. Wider cracks, loose plaster, staining, a soft wall surface or damage around a leaking pipe can point to an underlying issue. Painting over a moisture problem may give the wall a short-term lift, but the mark or damage can return. The source of water entry or movement should be addressed first.
For rental properties, shops and offices, it is also worth checking the full area at eye level and from an angle. Patch repairs stand out when only the obvious hole has been fixed and nearby scrape marks, old fittings or uneven surfaces have been missed.
What you need for a clean plaster repair
Good results come from careful preparation, not simply applying more filler. For minor repairs, you will generally need a scraper or filling blade, sanding block or pole sander, suitable wall filler, a clean cloth, primer and protective drop sheets. A dust mask and safety glasses are sensible when sanding, particularly in occupied homes or workspaces.
Choose the repair product for the job. Lightweight filler suits pinholes and small dents because it is easy to apply and sand. A setting compound or patching product is a better choice for deeper holes and larger damaged sections. Fine surface cracks may need a flexible repair compound, while cracks that have been opened up or are likely to move can benefit from reinforcing tape beneath the compound.
Using too much material in one application is a common mistake. Thick filler can take longer to dry, shrink as it cures and leave an uneven edge. Building the repair in thin layers takes a little more time, but it gives a flatter, stronger surface for painting.
Plaster repair before painting: the right process
Prepare the damaged area
Start by protecting floors, furniture and nearby fittings from dust. Use a scraper to remove any loose or unstable material around a crack, hole or damaged patch. The edge needs to be sound before new compound is applied. Wipe the area clean so filler can bond to a dust-free surface.
For a hairline crack, gently widen the line into a shallow V shape with a scraper. This may feel counterintuitive, but it gives the repair compound a proper area to grip rather than sitting only on the surface. Do not aggressively cut into the wall if the crack is very fine or the plaster is otherwise sound.
Deep holes should be cleaned out and filled in stages. If the opening is large, damaged or weak around the edges, it may need a proper plaster patch rather than a quick fill. This is where professional repair work can save time and prevent a noticeable repair after painting.
Apply compound in thin, controlled coats
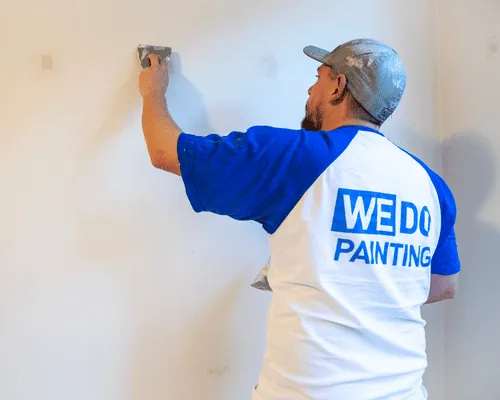
Load a small amount of filler onto a broad filling blade and press it firmly into the hole or crack. Then draw the blade across the wall with light pressure, extending beyond the repair to feather the edges. The aim is not to leave a raised mound. It is to bring the repair level with the wall while creating a gradual transition into the surrounding plaster.
Let the first coat dry fully according to the product directions. Drying time varies with the depth of the repair, room temperature and ventilation. Rushing this stage can lead to marks showing through later, even if the patch initially feels dry on top.
Once dry, apply a second thin coat where needed. Larger repairs often need two or three applications to achieve a flat result. Check your work from the side by holding a light across the wall. This low-angle view reveals ridges and hollows that can be hard to see face-on.
Sand for a wall that disappears under paint
Sand only after the compound has fully cured. Use fine-grit sandpaper and work gently across the entire feathered area, not just the centre of the patch. Your hand is a useful final check: run your palm lightly across the repair. It should feel level, without a sharp edge or noticeable dip.
Avoid over-sanding. Taking too much compound away can expose the repair again or roughen the surrounding plaster. If a low spot remains, apply another skim coat, allow it to dry and sand again. It is quicker to correct it now than to live with a visible patch after the room is painted.
Vacuum dust from the walls and wipe down surfaces with a clean, dry microfibre cloth. Dust left on the wall can affect adhesion and leave a gritty finish in the paint.
Prime repairs before applying finish coats
New compound and exposed plaster are more porous than an already painted wall. If you paint directly over repairs without priming, the patched areas can absorb paint differently from the rest of the wall. This may leave dull patches, flashing or changes in sheen that become obvious in daylight and under downlights.
Apply a quality plasterboard or acrylic primer over the repaired areas, extending slightly beyond their edges. For extensive wall repairs, staining or a major colour change, priming the entire wall often gives the most even finish. The best approach depends on the size of the repairs, the existing paint condition and the chosen topcoat sheen.
Low-sheen paints are popular for interior living areas because they provide a soft finish while hiding minor surface variation better than higher-sheen products. They still will not disguise rough preparation. Satin and semi-gloss finishes are practical for trims and areas needing regular cleaning, but their reflectivity makes wall defects much easier to notice.
Common repair mistakes that affect the final paint job
The biggest issue is treating filler as a shortcut. Filling a crack without checking why it appeared, skipping dry time or sanding only the centre of a patch will usually show in the completed paintwork. Another frequent problem is using paint as a primer. Extra coats may improve coverage, but they do not seal a repaired surface in the same way.
Trying to match a small painted patch also has limits. Even with the same paint colour, an older wall can have changed slightly through sunlight, cleaning and general use. For a uniform result, painting from corner to corner is often the better option, particularly on feature walls or in areas with strong light.
Commercial spaces need an additional level of planning. Repair and painting work should be scheduled around customers, staff access and safety requirements. Protecting floors, stock, furniture and equipment matters just as much as achieving a neat wall finish.
When to call a professional painter and plaster repairer
Minor holes are manageable for many property owners, but some repairs are best handled by an experienced team. This includes large holes, recurring cracks, water-affected areas, damaged cornice sections, multiple walls with uneven surfaces and repairs in high-visibility commercial areas. A professional can assess the substrate, complete the repair correctly and paint the area as one coordinated job.
For Melbourne homes, offices and investment properties, WE DO Painting can prepare damaged walls and deliver the painting work with clear communication, careful site protection and a finish that suits the space. It avoids the frustration of organising separate trades and wondering whether the paint will properly cover the repair.
A smooth painted wall starts well before the first topcoat. Give plaster repairs enough time, inspect them under good light and prime them properly. Those practical steps are what turn a painted room from simply freshened up to properly finished.